


Desk/Office Locator
 When I first started working for the Computer Science Department in Fall of 2004, I had two problems:
- I spent all my time installing Windows on PC's by hand.
- When I was done installing a machine, I had to ask someone where the owner of the machine sat so I could give them their computer back.
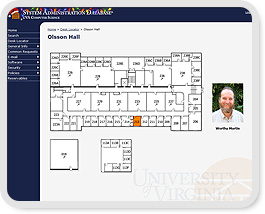
So, I set out to quickly make a new system which would merge the old office locator (faculty and staff offices) with the desk tsar system (student desks). A few weeks of obsessing over Visio diagrams of the buildings floorplan, and I had a locator for pretty much everyone in the building. I'm relatively pleased with how it turned out though it was definitely a rushed job.
Probably the coolest part about the locator is the way in which I highlight the different rooms as you move over them. For any given room there are only two images (highlighted and normal) with the topmost image having a map assigned to it to mark off what room is what. When a user moves their mouse over a link on this image map, the coordinates of the map element are translated into css coordinates which clip the corresponding section of the highlight image using css and a little JavaScript. Once the appropriate part of the highlight image has been clipped, I show the image. This method works extremely well if you're only using rectangular areas, and keeps you from having to make a separate image for every single hightlightable element on the image. For example, the main view of Olsson hall has 46 individually highlightable rooms, but uses just 2 images.
You can check the locator out here. Note that it has a couple of glitches which I'll fix one of these days.